
Galileo Seat Map Command: You can assign seats on any airline that participates in the Galileo seat program. Each airline has specific guidelines for making advance seat assignments.
Galileo rejects your seat request if you make a request that is contrary to the guidelines of the airline you are booking.
Galileo Seat Map Command
Either when adding a seat assignment to a Booking File, you can make a specific request from a seat map, or the Galileo system will request a seat assignment for your customer.
This section explains how to:
- Request seats
- Select seats from a seat map
- Display seat assignments
- Cancel seat assignments
Requesting Seats in Galileo Booking
Unless you request specific seat numbers, Galileo assumes the passenger prefers a window seat for all confirmed air segments. If no window seats are available, Galileo assigns an aisle seat, followed by a middle seat.
If more than one passenger is booked in a Booking File, at least one window seat is assigned along with any adjacent seats, if available.
Selecting Seats from a Galileo Seat Map
You may want to view a seat map prior to requesting a seat assignment. You can view a live seat map for most confirmed flights in Galileo. A live seat map is updated each time you display it.
Note: Airlines may block some seats for airport check-in only or for frequent flyers.
Displaying a Galileo Seat Map
To display a live seat map on a participating airline, you have four options.
- Click on the class of service in the PNR Viewer window.
- Click the icon in the PNR Viewer window and select Assign/Edit Seat Assignment.
- Click on the PNR drop-down menu above the Terminal window and select Assign/Edit Seat Assignment:

Type the command #SEAT in the Terminal window, this is a preconfigured Travelport Quick Command.
Once the seat map is displayed it will show the flight and traveler detail. There is a key at the bottom of the seat map to indicate what the color-coding of the seats represents. The first passenger will be highlighted by default, and the first flight will automatically be displayed.
You also have the option to filter your seats results to show free or paid seats if applicable. Hover the mouse over the seat you wish to assign and left hand mouse click. As you hover the mouse over the seat, the seat details will appear in a box. If there is a fee charged for the seats by the airline, this shows in the box as well as a subtotal at the bottom.
Galileo Quick Reference Guide | Galileo GDS Commands
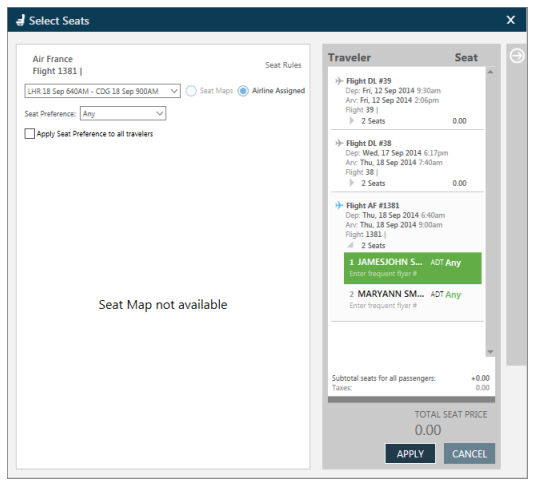
There are also two radio buttons at the top of the screen and you can choose to either click on seat map if you want to choose your own seat or Airline Assigned for the carrier to select your seat ( Airline Assignment is applicable for GDS carriers only.)
Example screen display:
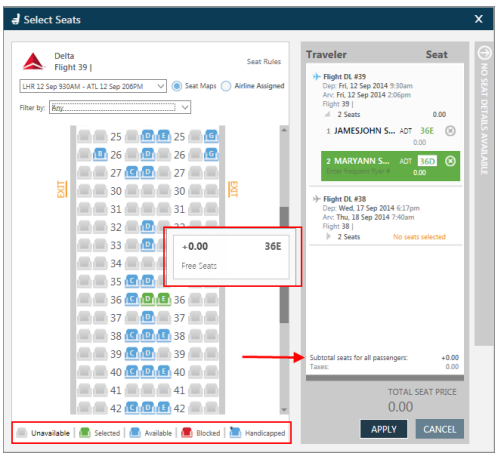
The assigned seat number will turn green on the map and will now show next to the passenger name, the system will then auto Tab to the next passenger for seat assignment. Once seats on the first flight are booked it is possible to move through all flights and book the remaining seats in the same manner.
Once all seats on all flights have been assigned, the total cost if any will be displayed at the bottom of the screen you can then click on APPLY.

When an airline does not support a seat map, a message will display advising this:
If you click on APPLY before all seats have been assigned the following message will appear:

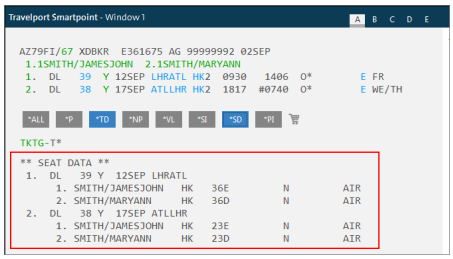
Displaying Galileo Seat Assignments
Once you assign or request seats, the *SD button appears and may be used to display seat data within the Booking File:
Changing and Deleting Galileo Seat Assignments
If there is a need to change or delete the currently assigned seats you can easily achieve this. Depending on the requirement it is possible to cancel all assigned seats or just those for a specific segment of air itinerary.
Specific segment
To change/delete seat assignments for a specific segment, click on the class of service or the icon in the PNR Viewer window.
Alternatively access this through the PNR drop down menu and the Assign/Edit Seat Assignment option or through the Travelport Quick Command #SEAT in the Terminal
window.
To cancel seats click on the icon next to each of the assigned seat numbers, then click on APPLY.

Note: The assignment of a new alternative seat will also cancel previously held seat numbers.
Alternatively, when a change is required rather than a cancellation, highlight the passenger name on the flight required and select an alternative seat. Click the APPLY button to complete the action.
All segments
To cancel seat assignments for all passengers/segments, enter S.@ in the Terminal window.
Screen response.

Galileo Paid Seat (Ancillary Service)
You are able to purchase seat upgrades as an ancillary service from some airlines using the seat map. The booking must have been ended and a record locator must be present.
- Ancillary Services are further explained later in this course.
- Refer to the Booking File example for travel on Delta Air Lines.
- Click on the class of service to display the seat map for the segment:

When you select a seat, the cost for the seat is shown on the right-hand side of the screen. The Total Seat Price is shown at the bottom.
Example screen display:
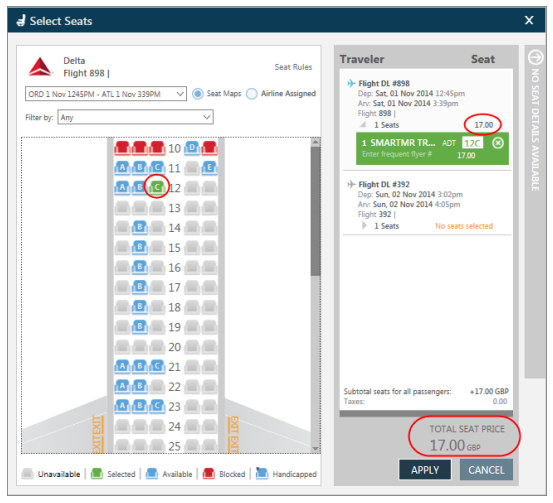
When you select a seat for the second Delta Air Lines flight, the Total Seat Price is adjusted to show the total price for both seats.

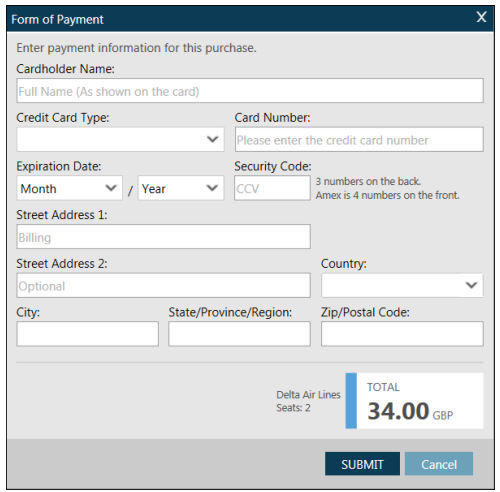
Paying for Paid Seats
When you have submitted your seat assignments by clicking on Apply, Travelport Smartpoint will display a form of payment screen.
Example screen response:
Completed screen example:
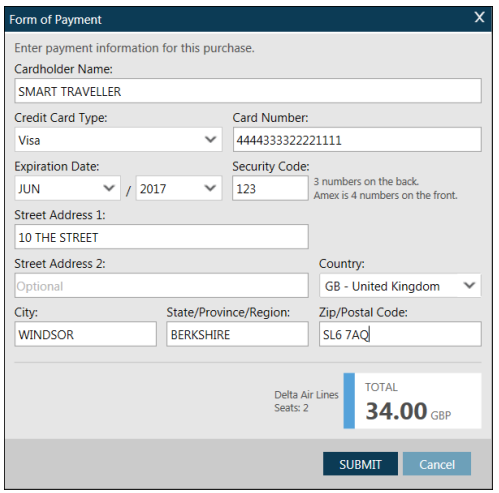
Click SUBMIT to submit the information.
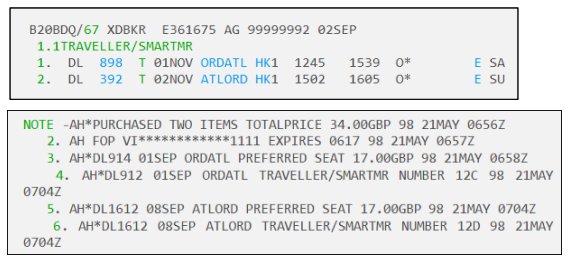
The seats will not show in the seat assignment section of the Booking File.. Instead, the seat assignments will be documented in the Notepad field.
Refer to the following example:
Partial booking
When at least one seat is booked but at least one seat has failed to book, Travelport Smartpoint will display an error message. You must select alternative seats.
Cancelling a Galileo Paid Seat
To cancel a paid seat, click on the X next to the seat number for the appropriate flight.
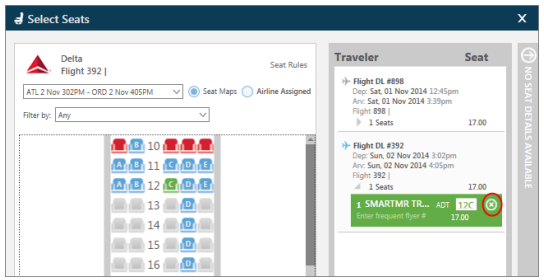
When the seat has been removed, click on APPLY at the bottom of the Seat Map screen.
Important note: If you cancel a paid seat, the credit card payment that you made previously will not automatically be refunded. You must contact the carrier and ask them to process the refund.