
Galileo Queues Commands : Ah, I see. In the context of travel technology, GDS (Global Distribution System) queues are a way for travel agents to manage and organize their bookings and reservations within the GDS. A GDS queue is essentially a virtual waiting list or inbox where bookings are held until an agent is ready to work on them.
What is Galileo Queues?
Galileo Queues Commands – Galileo is one of the major GDS providers, along with Amadeus and Sabre. Galileo queues are specific to the Galileo GDS and can be used by travel agents to manage their bookings in a more efficient manner.
There are several types of queues in the Galileo GDS, including:
1 – PNR (Passenger Name Record) queues:
These are used to store bookings that require action or attention, such as booking modifications, cancellations, or special requests.
2 – Queue-to-Queue:
This allows agents to transfer bookings between different queues to better manage their workflow.
3 – Category Queues:
These are used to group bookings by specific categories, such as bookings from a particular corporate client or bookings for a specific event.
4 – Waitlist Queues:
These are used to hold bookings that are on waitlist status, waiting for a seat to become available.
Galileo Quick Reference Guide | Galileo GDS Commands
Travel agents can create, modify, and delete queues in the Galileo GDS using specific commands, which vary depending on the GDS and the specific function being performed. The commands for working with Galileo queues are typically entered in the GDS command line interface.
Galileo Queues Commands
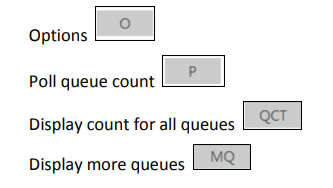
Galileo Queues Commands: You can manage work to be done on PNRs/Booking Files by performing various queue counts. In addition, you may view a list of PNRs/Booking Files in a queue. These functions are important factors in increasing office productivity.
The following icons are available in the Terminal Window to allow you to work with,
and manage queues.
Galileo Queues Commands Options
To help you manage your queues, you can set up a maximum of 10 Quick View
queues or queue categories.
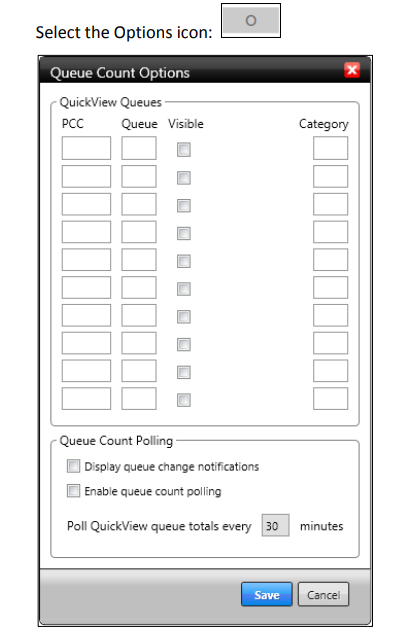
Note : : You can also select Queue Count Options from the Tools menu if required
Refer to the following completed example, specifying pseudo EA7 and queues 10,
16, 26, 22, 40, 35 and 36 with queue category JU.
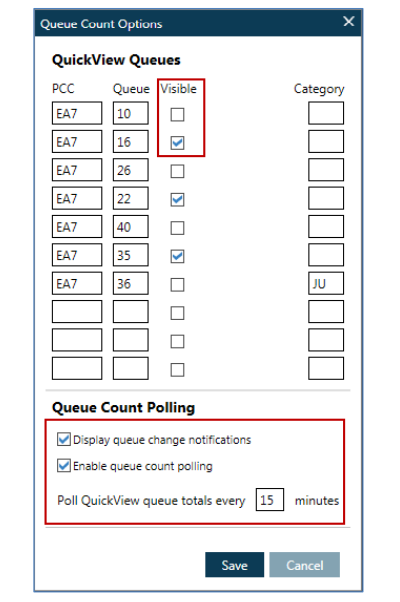
Check the Visible box so that queues 16, 22 and 35 are visible at the bottom of the
Travelport SmartPoint Terminal Window.
If you check ‘Display queue change notifications’, Travelport SmartPoint will
automatically advise you when PNRs/Booking Files are added to a queue.
Check the box to ‘Enable queue count polling’ and specify that you wish your queues
to be polled every 30 minutes.
Points to note:
- The minimum polling time is 15 minutes
- You can select a maximum of five visible queues
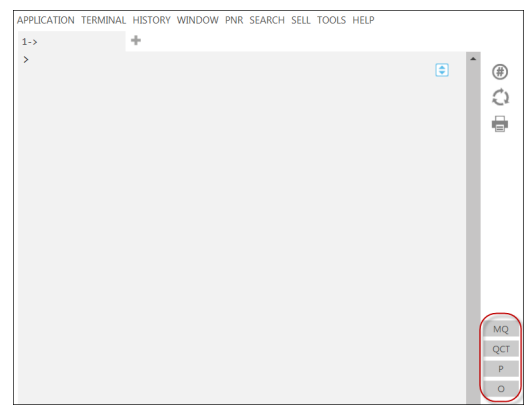
When you click ‘Save’, the MQ button at the bottom of the screen is activated:

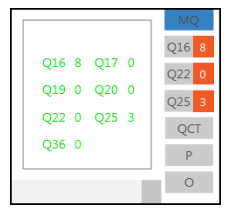
Galileo Queues Commands – The three queues that you made ‘visible’ (16, 22 and 25) show the numbers of
PNRs/Booking Files that are currently on those queues highlighted in an orange box.
Click on the MQ icon to display the numbers of PNRs/Booking Files on your
selected queues.
Poll queue count
You can click the P icon if you wish to poll your queues at any time.

Counting all Queues
You can click on the QCT icon to display the queue count for all queues.

Example screen response:

A queue number with an asterisk identifies a queue with categories.
Screen example:
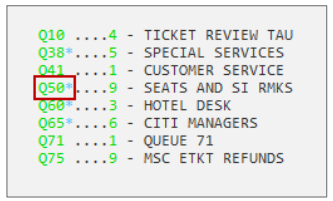
Click on the blue asterisk to display the categories and the Booking File count.

Note: Click on the asterisk again to close the display.
Listing Booking Files in a Specific Galileo Queues Commands
Click on one of the queue numbers to display the PNRs/Booking Files on that queue
in a separate window.
Example screen response:
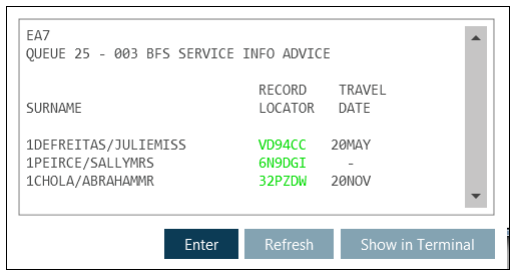
Note: Click ‘Show in Terminal’ to display the list in the Terminal Window.
Click on a Booking File record locator to take you into the queue and open the
booking in the PNR Viewer Window.
Example screen response:
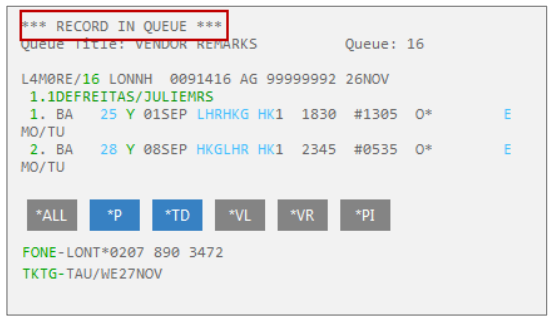
When you access a Booking File on queue, new buttons become available at the
bottom of the active window. These enable you to work the queue quickly and
easily.

Click the QP button to retrieve the previous Booking File on queue.

Click the I button to ignore the current Booking File and retrieve the next one.

Click the QR button to remove the booking from queue.

Click the QXI button to ignore the booking and sign out of the queue.

Click the Q button to take you back to the queue buttons.
